

The Ultimate Optical Fiber Stripper Guide
An Optical Fiber Stripper is arguably the most fundamental hand tool for any technician working with fiber optic networks. In an industry where precision is not just a goal but a requirement, the quality of your stripping tool directly impacts signal integrity, network reliability, and overall project success. This comprehensive guide delves deep into the world of fiber optic strippers, exploring their types, functions, and best practices. Furthermore, we will highlight how choosing a professional-grade tool from a trusted supplier like EPCOM is the first step toward flawless fiber optic termination and splicing. This article is designed for both seasoned professionals seeking to refine their techniques and newcomers aiming to build a solid foundation in fiber optic installation.
What is an Optical Fiber Stripper and Why Is It Essential?
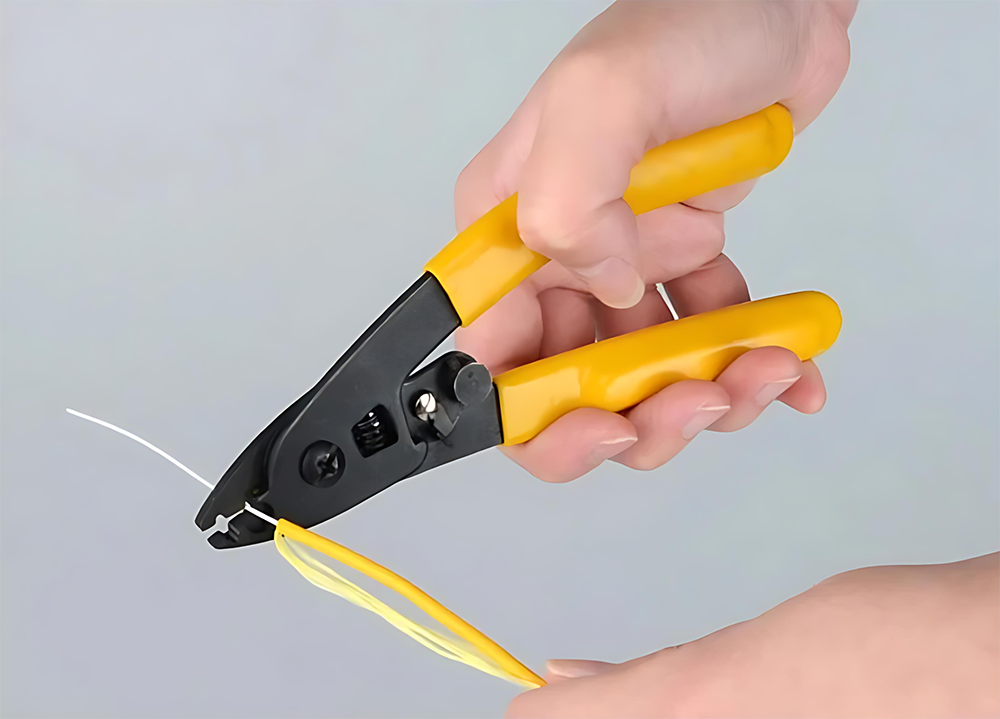
At its core, an optical fiber stripper is a specialized tool engineered to precisely remove the protective polymer coatings from an optical fiber without damaging the delicate glass core and cladding beneath. The typical fiber optic cable has multiple layers: the outer jacket, strength members (like aramid yarn), the buffer coating, and finally the acrylate coating that directly protects the glass fiber. An optical fiber stripper is designed to remove these buffer and acrylate coatings, typically from a 250µm or 900µm diameter down to the 125µm cladding. This process is a critical prerequisite for both fusion splicing and connector termination. Using an improper tool, such as a generic wire stripper or a blade, will almost certainly create microscopic nicks, scratches, or stress fractures on the fiber’s surface. Consequently, these imperfections can lead to significant signal loss (attenuation), back reflections, and catastrophic failure of the connection over time.
The Anatomy of a High-Quality Optical Fiber Stripper
Understanding the components of a superior optical fiber stripper helps in appreciating its function and making an informed purchasing decision. While designs may vary slightly, all professional-grade strippers share common features that ensure performance and reliability.
Precision-Ground Stripping Notches
This is the heart of the tool. A professional optical fiber stripper features multiple laser-drilled or precision-ground holes or notches. These are calibrated to exact diameters to remove specific coating layers. For example, a common three-hole model will have:
- A large notch for removing the 1.6mm to 3mm outer cable jacket.
- A middle notch to strip the 900µm tight buffer down to the 250µm coating.
- The smallest, most critical notch to strip the 250µm acrylate coating down to the 125µm glass cladding.
The edges of these notches must be perfectly smooth and manufactured to incredibly tight tolerances to avoid any contact with the glass fiber itself.
Ergonomic Handles and Locking Mechanisms
Technicians often perform hundreds of stripping operations in a single day. Therefore, ergonomic, non-slip handles are crucial for reducing hand fatigue and ensuring consistent pressure and control. Moreover, a reliable locking mechanism that keeps the jaws closed when not in use is essential for both safety and protecting the precision-ground stripping surfaces from damage when stored in a toolbox.
Exploring the Different Types of Optical Fiber Strippers
The term “optical fiber stripper” covers a range of tools, each designed for specific cable types and applications. Selecting the correct type is vital for efficiency and success in the field. EPCOM provides a comprehensive selection to meet the diverse needs of telecom professionals.
The “Miller” Style Three-Hole Optical Fiber Stripper
This is the most common and versatile type of stripper used in the industry. Its three-notch design allows a technician to perform the majority of standard fiber preparation tasks with a single tool. It’s the go-to choice for preparing fibers for fusion splicers and field-installable connectors. Its reliability and multi-functionality make it an indispensable part of any fiber optic toolkit.
The Flat Drop Wire Stripper for FTTx Applications
Fiber-to-the-x (FTTx) installations often use flat “drop” cables, which have a different construction from traditional round cables. These cables require a specialized tool. The Flat Drop Wire Stripper from EPCOM is engineered specifically for this purpose. It efficiently removes the outer jacket of flat drop cables without damaging the internal fibers or strength members. Using a standard stripper on these cables is ineffective and likely to cause damage, making this specialized tool a necessity for last-mile installations.
Adjustable and Specialized Optical Fiber Stripper Models
While most applications use standard fiber sizes, some projects may involve non-standard or legacy cable types. For these situations, an adjustable optical fiber stripper provides the flexibility to set the stripping blade diameter manually. Additionally, there are other specialized tools like thermal strippers, which use heat to soften the buffer coating for extremely gentle removal, often used in manufacturing or laboratory settings where the fiber is particularly sensitive.
A Step-by-Step Guide: How to Use an Optical Fiber Stripper Correctly
Proper technique is just as important as the tool itself. Following a consistent and correct procedure ensures a perfect strip every time and prolongs the life of the tool. For more in-depth standards and practices, consulting resources from organizations like the Fiber Optic Association (FOA) is highly recommended.
- Inspect the Tool: Before starting, always inspect your optical fiber stripper. Ensure the stripping notches are clean and free of debris. Check for any signs of damage or wear. A dirty or damaged tool can transfer contaminants to the fiber or cause scratches.
- Measure and Mark: Determine the required strip length based on the specifications of the splice tray, connector, or splicer you are using. Use a fiber stripping template or a marker to indicate the precise point on the cable where the strip should end.
- Position the Fiber: Place the fiber into the correct notch on the tool. For stripping the 250µm coating, use the smallest notch. Ensure the fiber is perpendicular to the blades to prevent an angled or incomplete strip.
- Close and Pull: Gently close the tool’s jaws around the fiber. Do not apply excessive force. With a smooth, steady motion, pull the tool straight along the fiber axis away from the cable end. Do not hesitate or twist the tool during this motion.
- Clean the Fiber: Immediately after stripping, the bare glass fiber is exposed and must be cleaned. Use a lint-free wipe and reagent-grade isopropyl alcohol (99% or higher) to wipe the fiber clean. A “two-wipe” method (once to clean, once with a fresh part of the wipe to dry) is considered best practice.
Choosing the Right Optical Fiber Stripper: A Comparison
With various options available, selecting the ideal tool can seem daunting. The table below breaks down the primary uses for different types of strippers to help guide your decision. All professional tools should be sourced from a reliable provider like EPCOM to guarantee quality and performance.
| Stripper Type | Primary Application | Common Cable Types | Key Feature |
|---|---|---|---|
| Three-Hole “Miller” Stripper | General purpose, fusion splicing, connector termination | 250µm, 900µm, 2-3mm jacketed fiber | Versatility and industry-standard design |
| Flat Drop Wire Stripper | FTTx, last-mile installations | Flat drop cables with FRP strength members | Specialized for non-round cable profiles |
| Adjustable Stripper | Legacy systems, non-standard fiber sizes | Varies, custom cable constructions | Flexibility for unusual applications |
| Thermal Stripper | High-end manufacturing, R&D labs | Sensitive or specialty coated fibers | Extremely gentle, heat-assisted removal |
Beyond the Strip: Assembling the Complete Fiber Optic Prep Kit
A perfect strip is just the first step in the termination process. To ensure a low-loss, high-performance connection, the technician needs a complete toolkit of equally high-quality instruments. An optical fiber stripper works in concert with a cleaver and cleaning supplies.
The Next Critical Step: The Optical Fiber Cleaver
After stripping and cleaning, the fiber must be “cleaved” to create a perfectly flat, mirror-like end-face that is exactly perpendicular to the fiber axis. This is achieved with a high-precision tool. The Optical Fiber Cleaver is designed to score the fiber and then break it in a controlled manner, producing the ideal surface for fusion splicing. A poor cleave is one of the biggest sources of insertion loss and optical reflection, making a quality cleaver absolutely non-negotiable.
Ensuring a Pristine Connection: The Fiber Optic Cassette Cleaner
Contamination is the enemy of any fiber optic connection. Microscopic dust particles, oils, and other residues on the fiber end-face can block the signal, causing massive attenuation and even permanent damage to the connectors. Before mating any connectors or performing a splice, cleaning is mandatory. The Fiber Optic Cassette Cleaner is a modern, efficient tool that uses a roll of ultra-clean lint-free microfiber cloth to wipe the end-face clean without leaving any residue. It is far superior to using wipes and alcohol for cleaning connector end-faces, providing a consistent, repeatable cleaning action.
Data Visualization: The Impact of Professional Tools on Efficiency
The difference between using a professional-grade optical fiber stripper and improper tools is not just about quality; it’s also about efficiency. A skilled technician with the right equipment can significantly reduce preparation time per fiber, which translates into major time and cost savings on large projects. Below is a graphical representation of the typical time spent per termination.
Average Time per Fiber Termination
This chart illustrates the significant time saved—and rework avoided—by using a high-quality optical fiber stripper and cleaver compared to struggling with substandard tools.
Maintaining Your Optical Fiber Stripper for Longevity and Performance
A professional optical fiber stripper is an investment that pays for itself over time. To maximize its lifespan and ensure it always performs to specification, proper maintenance is key. After each use, clean the stripping notches with a soft brush and isopropyl alcohol to remove any coating residue. Store the tool in its designated pouch or a separate compartment in your toolkit with the lock engaged to prevent the blades from being nicked by other tools. Never use the tool for cutting or stripping anything other than fiber optic coatings. Attempting to strip copper wire or other materials will instantly damage the precision-ground surfaces. For a deeper dive into the physics of signal loss, resources from industry leaders like Corning provide excellent technical papers.
Conclusion: Your Partner for Professional Fiber Optic Tools
In conclusion, the optical fiber stripper is a foundational tool that sets the stage for every successful fiber optic connection. Its role in cleanly removing protective coatings without harming the delicate fiber cannot be overstated. From the versatile three-hole stripper to specialized models for FTTx applications, choosing the right tool is paramount. By understanding the different types, mastering the correct usage techniques, and committing to proper maintenance, technicians can ensure the highest level of quality and reliability in their work. For sourcing these critical tools, partnering with a knowledgeable and reputable supplier is essential. EPCOM stands as a leader in providing high-quality, professional-grade telecommunications tools and equipment. We are committed to empowering technicians with the instruments they need to build and maintain the networks of tomorrow. Explore our full range of fiber optic solutions and equip yourself for excellence.